
How to make a Program available to All Users in Windows 11/10
If you have multiple user accounts and you want to make a program available for all users in Windows 11/10, you can go through this guide. Unless it is a portable app, you can make it available for all the existing users on your computer.
How to make a Program available to All Users in Windows 11/10
To make a program available to all users in Windows 11/10, follow these methods:
- Install apps for all users
- Allow other users to use any program
To learn more about these methods, continue reading.
1] Install apps for all users

If you have two or more user accounts, you can install an app for all users. By default, many programs offer two options –
- Install for the current user account
- For all accounts.
If you choose the former option, the app will be installed for the current user account only. However, if you choose the second option, all the other users can find it in their accounts as well. In that case, all you need to do is to open the app and set it up as per the requirements.
The advantage of this method is that you do not need to worry about permissions and other things. That is why we always recommend you follow this method. However, there could be times when you might have already installed an app and cannot follow this way. In that case, you can relocate the installed app.
2] Allow other users to use any program
To relocate an installed app to another user account, you need to do two things. First, you must obtain the app shortcut and copy it to the Public Desktop folder. Second, you need to change the permissions.
To get started, press Win+R to open the Run prompt and enter this path:
%APPDATA%\Microsoft\Windows\Start Menu\Programs
Alternatively, you can show Hidden files and folders and navigate to this path:
C:\Users\user-name\AppData\Roaming\Microsoft\Windows\Start Menu\Programs
Copy the app shortcut you want to relocate. Then, open this path in the File Explorer:
C:\Users\Public\Public Desktop
Next, you need to paste the program shortcut. Once done, right-click on it and select the Properties option from the context menu.
Switch to the Security tab and click on the Advanced button.
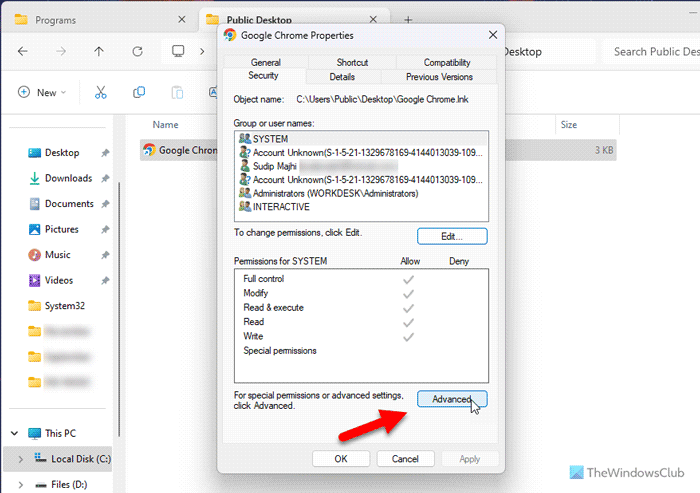
Click the Change button. Then, type Everyone in the empty box and click on the Check Names button.
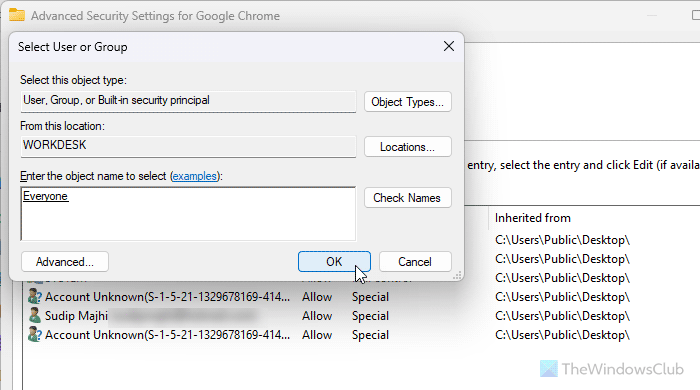
Click the OK button twice to return to the Properties window. After that, click the Edit and Add buttons, respectively.
Again, type Everyone, click on the Check Names, and click the OK button.
Finally, select the Everyone user and tick all the checkboxes in the Allow column.
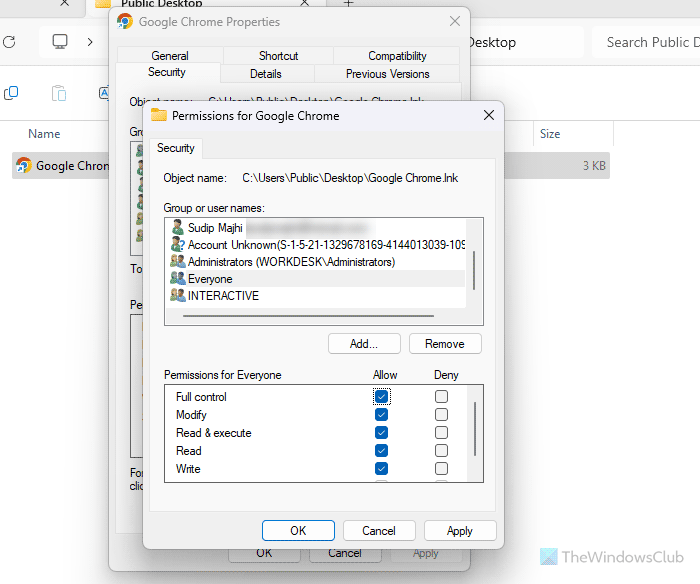
Next, click the OK button. Once done, you can open any user account and use the app without any problem.
I hope this guide helped you.
Read: How to move User Profile Data Folders to another Drive in Windows
How do I make a program accessible to all users?
You can make a program accessible to all users by installing it for all users. However, you can also relocate all the apps to another user account and let him/her use the program. For that, you need to copy the app shortcut and modify the permissions accordingly.
How do I make a file available to all users in Windows?
By default, all the users can access any file or folder stored in any drive in Windows 11 and Windows 10. For that, you do not need to tweak anything or modify any permission. You can simply navigate to the file path in any drive (i.e., D, E, F) and open the file as per the requirements.
Read: Transwiz User Profile Transfer Wizard lets you migrate User Profiles in Windows
#Program #Users #Windows